Tuesday, June 30, 2015

A look behind the scenes....

To kick off the 1 month anniversary week of Homespun and Redone, we want to give you a glimpse into the life of the faces behind our blog!

Hey y'all! I'm Laura. And that in the background is my pride and joy, my baby, my Kawasaki Teryx Side by Side. I'm a work-aholic but going 4-wheeling in the beautiful mountains around the south is one of my favorite hobbies!
I even drag race and do sled pulls from time to time!
I live with my husband and two dog babies in beautiful East Tennessee at the foothills of the Smoky Mountains. My whole family lives here, it's a wonderful place to grow up! I would never dream of leaving here well.... unless I scored a beach house! Ha!
About a year ago, me and my aunt started taking an upholstery class through our local school system. I fell in love with it! That's one of the ways the blog came into fruition with my friend Kelli. We both wanted a platform to share our passion of repurposing discarded furniture to the public and to give inspiring tutorials! Here is the link to my Mamaw's Rocking Chair Redo! 
Some other random things about me, for one I'm obsessed with owls! I think I really have a problem! Anytime I see owl fabric at the fabric store I usually buy it. I have little owls tucked all over my house on display. This is my owl mug that I scored a few months ago! So cute!!
I have been doing bible journaling for a few months now. I'm a visual and creative person. So I love being able to illustrate what I read in my journaling bible. I pick up tape, stickers, pens, and scrapbooking supplies whenever I find them on sale to add to my collection.
When I'm not working, 4-wheeling, hanging out with family/friends or working on repurposing projects I love to take sight seeing trips around our area. This picture is from Cades Cove in the Smoky Mountains.
And last but especially not least, I like to do all these things with my favorite man, my husband, Michael by my side!

Laura

Sunday, June 28, 2015

Pretty Little Princess

In an earlier post I showed you how I loved being able to give repurposed items as gifts, especially to my little cousin on her birthday. Well, last year for her 3rd birthday my husband and I took on our biggest project yet with the intent to give this princess her very own dress-up station.
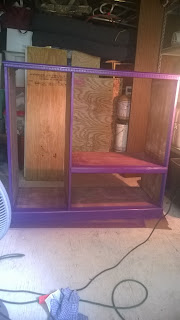
We actually started with an old entertainment center that had been passed down through the family, and I knew would have somewhat of a sentimental value as well as enjoyment.

We cleaned and sanded the surface so the paint would adhere to the wood.

Then the painting began. Pink and purple...aren't those every little princess' favorite colors.

Next we put in a hanging bar for all the dress-up clothes, then added the back. I decided to paint the back white to brighten it up, and then added the pink and purple flower decals for decoration.
Of course there had to be a full length mirror so the little princess could admire herself from head to toe. This was not an easy find, until I came across an old medicine cabinet at the flea market with the perfect size mirror. We removed the mirror from the cabinet, glued it onto a piece of plywood painted purple, then added it to the door frame.
Now it was time to put it all together.

 
Several accessories were added for those final touches, but the best part was to watch how these two little princesses knew exactly what to do at only 3 years old!


I don't think we will be able to out do this birthday redo, but the next birthday is coming up soon....stay tuned to see what is in store for birthday #4!


Kelli


Wednesday, June 24, 2015

DIY: Easy Turban Style Headbands

I have invested a small fortune in headbands to wear at the gym and on my four wheeling trips but every last one of them end up slipping off my head. I can never keep them on, even the ones advertised as non-slip! I thought I'd try making my own out of jersey knit fabric so I could customize it to my head size. After a little trial and error I finally came up with a headband that fits perfect and best of all no slippage!! It stays in place all day!

You can make your own too with these simple steps. First pick out some cute jersey knit fabric out of your stash or from your local fabric store. You can also upcycle t-shirts from your closet!
Next I cut 2 strips of fabric 5" wide by 21" long. This is the length that worked best for my head but you can always measure around your head to get a size better for you. Remember the jersey stretches so I cut mine a little smaller than my actual measurement. You can also play around with the width of the headband to make it wider or thinner to best suit your style.
Fold each strip length wise, right sides together and sew a straight stitch the entire length to create a tub. While sewing your straight stitch take your time and go slow because the jersey will shift on you and want your seam as straight as possible.
Turn the fabric tube so the right side of the fabric is facing out.
Next lay each strip of fabric, with the seam in the middle, in a plus (+) shape.
Fold the vertical strip over the horizonal strip until the ends meet.
Then fold the horizonal strip over so its ends meet. So both strips are interlocking.
Bring all 4 ends together and sew a straight stitch to close off your headband. 


Trim off any excess fabric and flip right side out! That's it, a super quick, super cute headband that's perfect for summer! With all the cute fabrics out today the possibilities as endless! We will have an Etsy Shop coming soon with a variation of this headband as well as many other homespun and redone creations! 
Laura

Saturday, June 20, 2015

Cute Fabric Junky

Every time I go into a fabric store, I never come out with just the items I needed. Somehow I always end up checking out all the new fabrics, looking at what is on sale, and digging through the remnants bin. Then I end up with all this fabric and my husband asking what I plan to do with it.
Throw pillows always seem to be an easy make, and are always great to have to spruce up a plain chair, empty looking couch, and who does love tons of throw pillows on their bed.
So, pillows it was....
After cutting out my squares and rectangles, I pressed the fabric to make sure the pieces evenly matched up. For some I chose contrasting fabric to go on the back and others I did the same on both sides. It all depends on the fabric you have and type of look you are going for.
Like I had said, pillows are the easiest sewing project, even for beginners. All you have to do is cut a square and sew a straight line. Super simple and so much fun when you make them yourself.
Next is the stuffing. You can buy pillow forms, recover an old pillow, or just purchase a big bag of poly-fil, which is what I had to use this time around. We have a great little place in town called "The Foam Rubber Outlet" and you can buy these huge bags of poly-fil for just a couple of dollars.
I always keep a bag on hand.
Once you've stuffed the pillows making sure to push it into the corners, you'll want to close up the opening with just a few slip stitches.
 And wallah!
Pretty pillows to accessorize your home or to give as a gift!
 
Kelli


Tuesday, June 16, 2015

Oh Birds of My Soul....

It was love at first sight when I spotted this fabric at Joann's. I knew I had to find a project to display it on!
My Mamaw (which is southern for Grandmother...lol) had a great, old rocking chair she needed repaired and upholstered so I knew instantly this is the fabric we should use on it! My Mamaw agreed, so me and my aunt deconstructed and repaired the chair in our upholstery class.
We added new webbing underneath the chair to reinforce the new springs we put in. Next we tied off the springs and I filled all the cracks and deep scratches with wood filler. Then it was time to sand it down!
After lightly sanding the rocker, we knew we wanted to just restore the natural wood, so I rubbed on Howard Restor-A-Finish with steel wool. The key with using this product is working in small areas at a time and wiping off the excess Restor-A-Finish with a clean rag after you rubbed it in with the steel wool.
After going over the whole chair with Restor-A-Finish, I let it dry overnight and then waxed it with Howard Feed-N-Wax. Again, work with this in small areas and rub in with a cotton rag then go back over with a clean rag and wipe off the excess. This stuff smells amazing and makes your wood surface so smooth! This was my first time using the Howard brand products and I will definitely be using them again on future projects!
That old rocking chair was really shining after this rub down!
Next came building back the chair with new foam, cotton and batting.
Now time for that beautiful bird fabric I had been waiting for!
I trimmed the fabric from the seat and finished the edge with a brown decorative trim. The old foam back cushion was still in good shape so I sewed a new cover for it and placed it on the chair. This is the finished rocking chair when it was delivered to my Mamaw's house. She LOVED it! 
Laura