Showing posts with label Homespun and Redone. Show all posts

Thursday, October 8, 2015

Long Time No Boggin'

It's been forever since we have posted on the blog, but its been a busy end of summer and start of fall. The best thing that happened....I went on vacation!!!!


It was a great trip to the sunshine state! I have loved Florida since I was a kid. I used to carry the directions of how to get to Daytona Beach in my wallet because there was no such thing as the internet, GPS, cell phones or Apps. This way if I ever decided to run away or when I turned 18 and decided to move, I'd be prepared. In my Senior book I wrote that in 10 years I would be living in a beachfront condo in Daytona Beach, working as a travel agent, unmarried, and driving a 1979 (I did not graduate in '79 just liked that year's model) midnight blue Corvette Stingray. HAHAHA!!!!!

By the time I was 28, I was married living across the street from were I grew up and had a 6 year old son. Funny how life works out just the way we planned. LOL

Anyway, on this vacation I had told my husband I wanted to go pickin', so we hit flea markets on the way down I95 to Florida and on the way back. We also stopped in several shops in Daytona and surrounding little towns to see if we could find anything unique.

The haul wasn't huge, but the finds were fabulous.

We first found the flip-top table in a little shop in Daytona. The shop owner had just gotten it in, and didn't have any history on it, nor did he know what the inlay was made of. I'm still trying to some research to see if I can find out exactly what it is, but it is a beautiful piece.


We then found this awesome antique smoking table at a wonderful cluster of shops in Holly Hills. I had never seen anything like it in my neck of the woods. See how it has the drawer on the side with the ash tray and cigar holders with a kerosene lighter, then the humidor on the front. Whether you smoke cigars or not the piece is just fascinating to me, and would make a beautiful side table in your living room or bedroom.


We stopped at this huge shop on the river in Daytona that was packed full of antiques and repurposed items. It was a paradise. I noticed this corner chair just sitting along a wall, but it had no tag or info on it. The seat was not attached and was obviously upholstered over, but it was something I had not seen before at all. I was intrigued...then this little old lady spoke up and asked if I was interested in her chair. I said yes that it was cute. I didn't want to sound to eager and her throw out a HUGE price that I couldn't afford, but instead she said she was the owner's mother and offered me the chair for a decent price. I was hesitate because though I thought it was a unique piece, I was unsure if the price she was asking was really the deal she made it out to be. I decided to think about it, research it, and if it was meant to be I'd be back on Friday and pick it up. So.......I went back Friday and sure enough there was the chair this time tagged with the price she had quoted me. I snagged it up and brought it home with me!


On the way home we stopped by the St. Augustine Flea Market. Loved this place. It had such a variety of stuff to look through, but unfortunately I didn't score anything. My husband however found this great old fishing pole. His intentions were to use the guides off the pole on an antique rod/pool cue he is fixing up for his brother, but after being stopped by a man at the flea who informed him it looked like a valuable antique rod that he got a super deal on.....he is thinking he's going to keep it for himself and find something else for his brother.
 
 
Now lastly on our pickin' excursion my husband and I had stopped at a flea market in Jacksonville on our way down, and had seen a small telephone table and chair. It was a corner table, something we had not seen before. We couldn't make up our minds on whether it was worth picking up, so we left without it. Then as the week went by and we were out pickin' my husband kept bringing up that telephone table, and how he thought we should have gotten it. So on the way home we stopped again at the flea market and picked up the table. The gentleman selling it was the only antique dealer at this flea market. This was one of those knockoff fleas meaning there were lots of purse dealers, sunglasses, cellphone cases, socks, sheets, just all the stuff I am not really interested in finding at a flea market. I figured this is why the little table was going unnoticed. Everyone coming to this flea market had a cell phone and no idea what a telephone table would ever be used for.


So now we are back with our little haul, and eager to get started on the next phase of Homespun and Redone. New and exciting things coming next week! I can't wait to share with you!!!! I am SOOOO EXCITED!!!!


Kelli

Monday, August 31, 2015

Another Happy Princess

At the recent "Princess" birthday party, a friend of my cousin's asked if I would be willing to make her little princess a dress up station for her birthday. She needed it by the end of August, so that didn't leave much time. However, nothing makes me happier than seeing those little smiling faces when they are playing with their new present, so I was more than happy to do it for her.


I came across this one time entertainment center at one of my local thrift stores, so I took it home and got started right away.


First came the sanding, and then the priming. I don't care what anyone says. The actual paint goes on much better if you just take the time to lightly sand and prime your piece. I know people hate doing it, I don't think its all that fun, but if you want your piece to look like it should....take the time.

Next came the paint. I had the Mom go online to Lowe's website and pick a color from the Valspar color selector. That way I was sure to get exactly what she wanted for her little princess. Once the paint dried, it was time to decorate.


The little princess likes butterflies, I was told, so we went with that theme. I love the "BeYOU*itful" sign. Every little girl needs to know that being yourself is the most beautiful person in the world. Finally came delivery day, and smiles all around. So happy to see another satisfied princess!


Kelli


Tuesday, August 25, 2015

Getting ready for Fall y'all!


I have become slightly obsessed with making paper wreaths. I've found there are all sorts of paper you can use to make the wreaths, and they take no time. So, while I am currently working on a larger project that requires a lot of paint drying time, I have been busy making a few of the wreaths.

I found there are many uses for scrapbook paper thanks to Pinterest! I have never been a scrapbooker, but there are tons of other uses for all those beautiful papers other than just making a photo album. This wreath seems a little unfinished to me, so I am thinking of added raffia in between the back cones to add a little something-something. It's gonna be a beauty once I get done.
This wreath is my attempt at recreating a sunflower look. I used construction paper for this one. It is huge, but so cute in person. It would make a great piece for Summer or Fall.
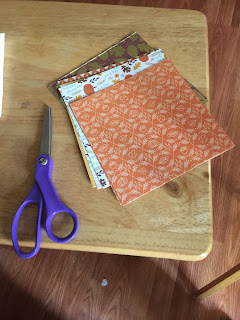
My latest creation for fall only took me about an hour with cutting the paper, making the cones, and then glue it all together.  Simply decide on the paper you want to use. My squares were 12x12, so I cut them into 4x4 squares and made my cones. Then I laid them out to determine how I wanted them to look.
This is a great project to do by yourself, with friends, or even with the kids. Once your done you have a great little wreath for your front door, over your mantle, or just anywhere you want to add a little Fall color.
 
Kelli

Tuesday, August 11, 2015

Desk Redo and visits from Arendelle

Another birthday under my belt...
The little princess turned 4 years old this year, and my husband and I had decided she needed a desk to get her ready for school. We found this old school desk at a local antique shop. It was exactly what I was looking for cause I have been dying to try chalkboard paint.
It had a few cracks and scratches, but we only wanted to fix issues the might hamper the use of the desk. Keeping most of those cracks and scratches is what gives the piece character.


Next I sanded both the chair and the desk and started painting the chair.

It took several coats of paint to cover the chair, but that is my fault as I failed to prime the chair first. The more I refurbish furniture, the more I realize that if I just take a moment to prime a piece with spray primer the actual paint goes on much easier and takes a lot less time to cover.

I did not make that mistake with the desk. I took 5 minutes to spray prime the desk the was able to paint the desk much quicker than the chair with only 2 coats....the chair took 4 coats plus touch ups.
After all the pink paint, I got the top painted with the chalkboard paint and got the desk put all back together. My husband felt all the pink needed something, so we added a few decals along with the name on the back of the chair.

 
Finally finished and off to the "Princess" birthday party. There were little princesses everywhere, and even a visit from Queen Elsa and Princess Anna.


 Kelli

Saturday, August 8, 2015

Old books...new looks

I have been a terrible blogger and business partner this week. My fellow Homespun and Redoner, Laura, has been on a well deserved and needed vacation this week, and I promised I would take care of the blog and do all the posts this week. Well...I didn't get it done. This is the only post I have gotten on the blog this week, all thanks to my sick and whiny husband. Next time I'm going with you Laura!!
 
Anyway, I did get a couple projects done this week. This easy project only took me about 45 minutes to get done, and turned out so cute!

 I went through and found some old paperback books that had seen better days. (No worries, this was an old book with missing pages. No classics were used.) I tore out some pages and got out my glue gun.

Next I made little cone shapes with the paper and glued the ends so they would stay together.

After I got several made, I grabbed and old cardboard crate and used a plastic bowl to trace a circle.
I cut out the circle and then used an x-acto knife to cut out a small opening for the ribbon I will use to hang my wreath.
Next I started hot gluing the paper cones to the cardboard. I glued at each quarter point first, then went from there.
Within 20 minutes I had a beautiful wreath that can be used in any décor. For me it looked perfect on the inside of my front door.


Kelli