Saturday, June 13, 2015

What to do with extra dining chairs


When my husband and I got married we each brought several things to the relationship. Since each of us had been previously married, there were lots of household items and furnishings to sort through and decide whether to keep, sell, or throw away. My husband had a set of 4 dining chairs with no dining table. We didn’t have a place for them, so we tried to sell them on an online yardsale site. When we didn’t have any takers, I took that as a sign to work a little repurposing magic.


The first thing I did was remove the seats, and sand down the chairs. They were painted black, but had been in out shed and gotten several layers of pink paint overspray on them from an earlier project.

Once I had sanded off all the paint, I decided to join 2 chairs together to make a bench. As I worked, I developed a plan. I’d make 2 benches out of the 4 chairs. One for my husband (to be seen in a future post), the other for my husband’s brother and his wife. A very deserving couple that does so much for everyone else, so I thought it could be mine and my husband’s way of saying thank you and we love you.

Next I spray painted the, now bench, black. Yes, I know they were black before I sanded them, but I hadn’t decided to do this as a gift before I started sanding and black or charcoal gray are my brother-in-law’s favorite colors. So, as I said I spray painted them black.

Then I added several coats of polyurethane just in case they wanted to use the bench outdoors.


Finally, I had my husband cut a board for the seat (that way he could say he helped build the bench), then covered it with the fabric my husband and I had chosen for the bench. I thought it turned out great! Now to see what the in-laws thought….


They loved it!!! They immediately moved an old rocker out of the way and put it in the front window of their living room.

The options were limitless with all their great pillows!
It really turned out to be a beautiful piece. 


T & K - Love you both so much! Thanks for all you do!!
Kelli


Tuesday, June 9, 2015

Saturday Adventure

Saturday we loaded up really early and went looking for treasures! The sun was just peaking up when I was on my way to pick up Kelli.

This Saturday was the annual Hwy 25 Yard Sale. It stretches from North Carolina through Tennessee into Kentucky. We started in Newport, TN and traveled through the towns of White Pine, Morristown, Bean Station, Rogersville, and Tazewell. 
We were a little disappointed that there weren't more people setup. But we still were able to find a few great treasures to bring home. The best stop was the White Pine Flea Market that is located on Highway 25E. There is truly something for everyone there. People sell tools, furniture, home decor items, clothes, farm animals and everything in between. We had a great time walking around there and found a few good buys but it was so HOT and we were glad when we finally made it back to the truck to get the air conditioner cranked up!
You can never go on an adventure without coming across something funny. While traveling through Rogersville, one stop had Elmo riding a John Deere Lawn Mower waving people in to their sale! So of course we had to pull in and check it out. I'm glad we did because I scored an awesome chair for ten bucks! 
While it wasn't the most successful buying trip, we still got a few good bargains  that we will be able to use on future projects. Below is Kelli's haul for the day. Be looking for the chair I purchased in a future post as I start descontruction and refinishing process on it!


Laura


Saturday, June 6, 2015

Gifting is the best part of a redo!

Crafting, sewing, and repurposing have all been a part of my life for as long as I can remember. I love making or redoing things myself as gifts more than any store bought item. So, I decided that each year (with the help of my husband) I would create a special piece for one of my littlest cousins on her birthday.
It all started with a rocking chair…..

My husband and I found this chair at an antique store, and knew it was the one.

I knew this would probably be a bedroom piece, so I wanted to try and match the pink/brown color scheme already in the room. After a little sanding, gluing, new paint, and seat cushions the rocking chair was ready!
Year 1 was a success!

So then comes year 2….and what are we going to make this time? We had discovered over the past year that my little cousin had a motherly instinct and every babyboll and stuffed animal was her “beebee”. So, that made our next choice obvious, every “beebee” needs a bed to sleep in. We found this piece at the same antique store as the rocking chair the previous year, so we went to work.

Of course, every baby bed has to have a new baby doll!

The best part of these gifts is seeing them in use, as she grows, or when she just wants to test them out for herself. (Thank goodness my husband reinforced that bed) LOL!

Kelli


Wednesday, June 3, 2015

My First Upholstery Project

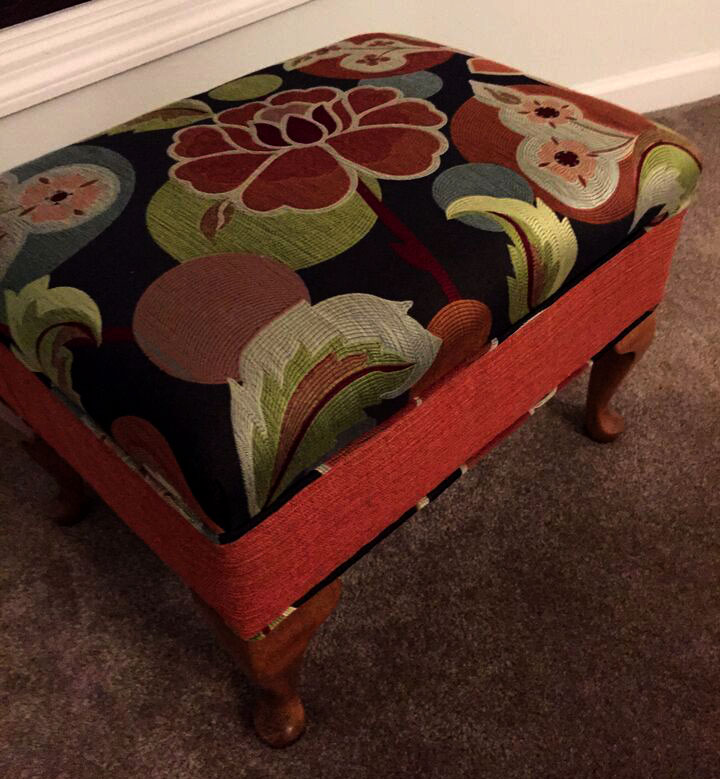
Last year I started taking an upholstery class. The first project I took to work on was this foot stool that my Mom came across a few years ago. It had seen better days. The fabric was worn in some spots, the batting was no longer evenly distributed, and the pattern was outdated.


I started by removing the legs and stripped all the layers of fabric, batting, and staples until all that was left was a wood box. Next I added a thin piece of foam and layered batting to make the top full and evenly distributed. One thing to remember when you take apart furniture to re-upholster is always keep the old fabric pieces that you remove, so then you can use them as your pattern for the new material. This way there is no guessing. If there are multiple pieces, be sure to label them (ie: back, front, right arm, etc.).  I did just that on this piece. I laid out my new fabric and used the old pieces as my pattern. I always cut my new fabric a little larger to err on the side of caution. You can always take away fabric if its to much but its hard to fix mistakes with too little fabric. I sewed my welting that would be used as the trim. I then stapled on the top piece of fabric making sure to center the design. Always work from the middle out to each corner when stapling on fabric. This makes it easier to create clean pleats on the corner. Then I stapled on the welting to create a clean trim line.


Next came another stripe of batting to cover the exposed wood and to create a full look for the side fabric covering. The side piece was stapled on by holding the fabric with the wrong side towards myself and placing staples onto the bottom edge of the orange fabric to the bottom edge of the welting. Once this is stapled all around your piece you flip down the side fabric so that the right side of the fabric is now facing out and tucking under the raw edge to create a clean line when the orange fabric meets in the back.


Finish it off by attaching a stripe of welting to the bottom of the piece creating the finishing trim. The only thing left is stapling on a dust cover and attaching the legs back onto the piece.
The key is don't get intimidated by upholstering or refinishing furniture. Pay close attention to the construction of the piece, take photos during the deconstruction process, and label your old fabric pieces. This will help everything fit back together easily for you as you reconstruct the piece.

Here is my finished product back at my Mom's house for her to enjoy!


A little before and after!

Laura

Monday, June 1, 2015


Welcome friends to the Homespun and Redone opening blog post!


We are Laura and Kelli, a pair of innovative friends out to decorate the world one stitch or brush stroke at a time. Our blog is all about handmade and repurposed items and our journey with each creation.


Being creative and inventive is what keeps us going. Shopping yard sales, thrift stores, and flea markets is our style of retail therapy, and roadside finds equal pure bliss.

Here is a sneak peak of different projects we will be spotlighting over the next few months. Also, if you see one of our projects you can't live without just shoot us an email, as many of our creations are for sale!


 We hope you enjoy and follow along on our homespun and redone adventure.