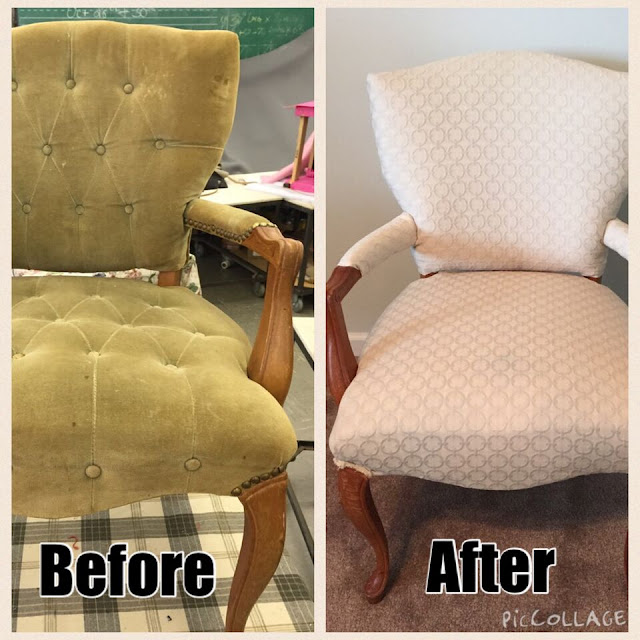
It is a beautiful side chair but definitely needed updating! Up first, labeling all the sections of the chair so it will be easier to put it back together. Always keep the fabric you are taking off the chair as intact as possible so you can use it as your pattern for your new fabric.
Now time for the deconstruction! Make sure to pull all the staples and tacks out of any project you undertake that way your new fabric and padding will lay on smooth and you don't want to risk shooting through old nails or staples.
Once your project is bare, clean up any wood imperfections with wood filler and sand lightly. At this point you can paint or stain your project. Since this was my first project I didn't do anything to the wood but I can always go back with the Howard's Restor-A-Finish I used in this project to smooth out any scratches on the wood. Since this chair was in good shape structurally, I just add scrap pieces of fabric to the back in seat to create a base to hold the new foam and batting.
After the foam seat and batting was layered on I started adding the new fabric to the seat. We found this beautiful off white fabric at our local Joanne's Store. They always have a good selection of fabrics for upholstery and home decor projects and with their coupons its usually a good bargain!
After the seat fabric was stapled on, I trimmed up the excess.I started working on the seat back of the chair by adding a layer of batting and the front peices of fabric then turned the chair around and finished off the back of the chair with a nice finished edge. I put batting on the arms and covered them with fabric and finished the chair with a trim of welting.
Here is the before and after! There are definitly some imperfections in the chair but I pretty proud of it with it being my first big project. I had a awesome teacher who guided me and helped me along the way! I hope this inspires you to try your hand at an upholstery project. Start small, find a inexpensive project at a thrift store or yard sale for your first project don't spend a lot of money on expensive fabric so if you mess up cutting you aren't out a lot of money. Always buy a little extra fabric to have a buffer for mistakes. If I can do this, anyone can tackle small upholstery projects around their home!
Laura


No comments:
Post a Comment